AWS Lightsail is the latest offering for the webmasters from Amazon. Check how you can easily install and setup WordPress on AWS LightSail.
Amazon’s idea is to provide virtual private server installations for smallest of businesses, so they don’t have to worry about anything other than their application.
Installing and running a WordPress was possible earlier on Amazon EC2 also, but many bloggers were skeptical about it.
Small blog owners look for fixed cost pricing but EC2 pricing is based on the usage. Most of the small blog owners are not ready for that kind of pricing, and not many have the technical skills to manage the EC2 installation.
Why AWS Lightsail
So let’s talk about why we should consider AWS Lightsail rather than other hosting solutions.
Most of the small website and blogs run on shared hosting and anyone who has used shared hosting will know the pain associated with it.
You do not have control of those hosting, sometimes your site will be working fine and sometime it will be slow like hell. It depends on the other users who are sharing the resources with your site.
One bad user can ruin the experience for all the sites on that server, even otherwise the speeds for shared servers are not that great.
What AWS Lightsail is offering is a virtual private server for small website owners with a shared server pricing. There are some additional benefits on AWS LightSail which is not available on Shared hosting like Static IP Address, DNS Management, Backup etc.
So rather than starting with a shared server and moving to VPS once your blog grows, start with a dedicated virtual private server.
You also get the AWS infrastructure, which will provide unparalleled performance. This blog is currently hosted on AWS Lightsail, you can check the performance to get an idea.
Here is a step by step guide to install and setup WordPress on AWS LightSail. Use the TOC to jump to specific sections of the guide.
How to install WordPress
Change Default User
Remove Bitnami Logo
Enable Static IP address
Setup DNS
Setup Site URL
Backup and Restore Service
Setup WordPress Emails
How to Install WordPress on Lightsail
AWS Lightsail WordPress installation is all automated and can be done in 5 minutes. AWS uses Bitnami WordPress image to install and manage the WordPress on AWS.
You need to create a server instance (click on Create Instance) and select the applications you need to install on that instance.
There are few things which you need to understand befog you start installing the WordPress.
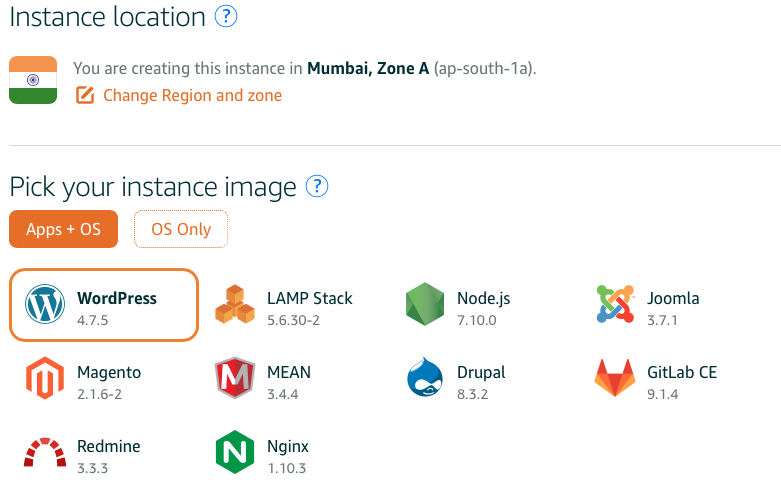
AWS has a lot of regions and some regions have different data transfer limits. AWS Lightsail will give the closest region based on your location but you can change it according to the target audience for your site.
Currently, US based region has maximum data transfer allocations. Once you choose the region, you have to pick an instance image.
You can opt for OS only or Apps + OS image. This is like installing the software on your computer. Select Apps + OS and select WordPress from the application list.
There are some other applications supported on the LightSail instance but we will only talk about WordPress.
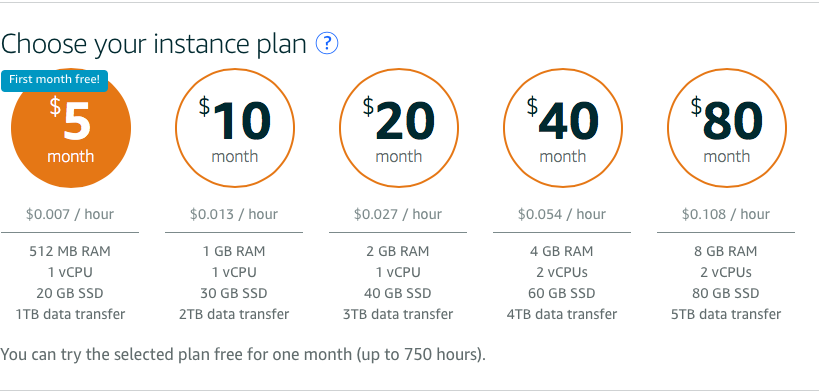
Once the app selection is done, you need to select the plan which you want to take for the instance. $5 plans are good for the people who are just starting a blog.
Otherwise, choose based on your need but remember all of them has SSD based storage so response time is usually fine.
I would recommend you to choose based on the traffic you are expecting. The upgrade process is simple so you can transition to higher plan later on.
Now name your instance, give it some meaningful name so that you can recognize that instance. Click on Create and you have a virtual server installed with OS and WordPress.
It might take a minute to provision your server. Once it is available, you will have a sample WordPress site running server available to you.
Change Default User
Once the instance is ready it will give you a public IP address. If you go to that public IP Address, you will see a sample WordPress site running.
You will need user-id and password for WordPress admin login. The default user-id is “user”.
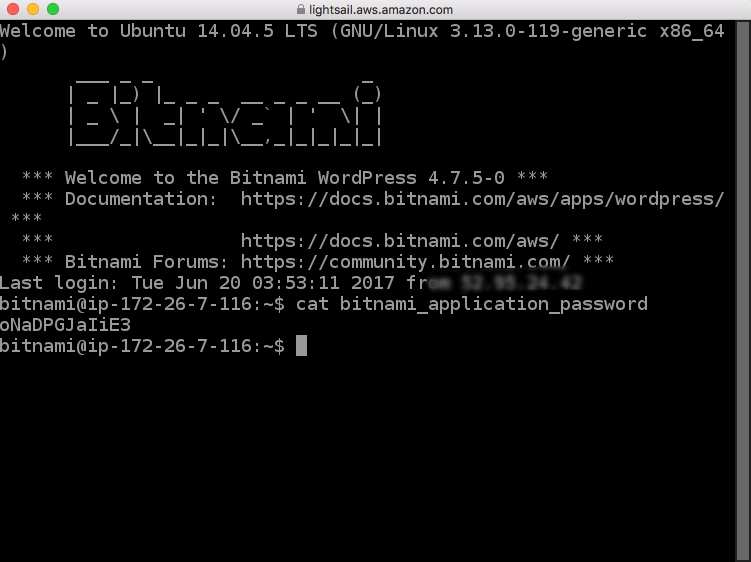
You will see a button connect using SSH on the LightSail panel. If you click on that it will open an SSH session.
Enter the blow command to get the password for the admin account.
It will display the password which you can copy and use it to login into wordpress admin dashboard.
I would suggest creating another user with the administrative privileges. Once you have created a new user, login with that user id and delete the default account.
Remove Bitnami Logo
There is a Bitnami logo which will be displayed at the bottom-right corner. You can enter the below command to remove that logo from the website.
You can browse the site to check the logo. If it’s still there you need to restart the web server. You can use the below command to restart the web server
With this, your WordPress account is setup and currently running on a public IP and can be accessed using that IP address.
Enable Static IP Address
The next step is to enable a static IP address for your WordPress site. There are other ways to make it available to the world but Static IP address is better in the longer run.
Later-on if you want to upgrade the server, you just need to create a new instance and assign it the same static IP address. That will take care of the server upgrade.
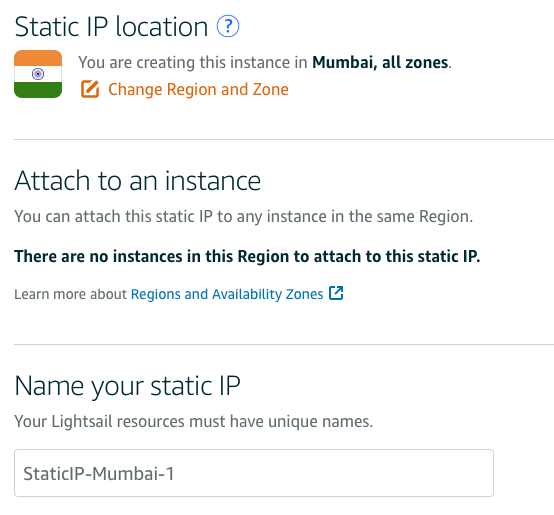
You will get a button to create a static IP on your LightSail resource panel. Once you click on that it will create a static public IP address and asked you to assign it to an instance.
You can assign it to the instance created for WordPress installation.
Remember, Static public IP address with a LightSail account is free as long as they are in use. So you have to assign them to an instance, otherwise, there will be a charge for them.
Setup DNS
Now you have a WordPress installation running with a Static IP address. Now its time to tie that IP address to your website name.
There are two ways you can do it and it depends on from where you have purchased the domain name.
You also get DNS service from AWS free with your LightSail account. If you decide to use that, you need to set the nameservers with your domain provider. This way AWS will do the name resolution for your website and you will use the AWS infrastructure for that also.
If you want to use LightSail DNS service, you need to create a DNS zone and add the DNS entries in that zone. You will get some nameservers for your DNS zone, which needs to be added to your domain provider as nameservers.
The other way is to keep using the services of your domain provider and update the A type record to point to a static public IP address. That way name resolution will happen with your domain provider and it will be transferred to your installation.
It’s all about the preference as you would not see much difference between both ways. The difference will be in some milli-seconds, so choose according to your choice.
Setup Site URL
The site URL will be set dynamically on AWS Lightsail. So once your DNS names are setup correctly, it should reflect in the WordPress Admin interface as your site URL.
But it can happen that it shows the site URL with www prefix and you would want it to display without that. In those cases you can edit the wp-config.php located at opt/bitnami/apps/wordpress/htdocs/wp-config.php
Look for the below section in that file:
You need to change these lines to point to the URL rather than host name.
You need to replace DomainName to your domain name which you want to use.
You can download the file through FTP, edit and upload it back or use the SSH shell to edit the file.
If the name doesn’t pickup than you need to restart the server. You can use the below command to restart your server in the ssh terminal.
Backup and Restore service on Lightsail
AWS Lightsail come preconfigured with the backup and restore services and it’s as easy as clicking a button.
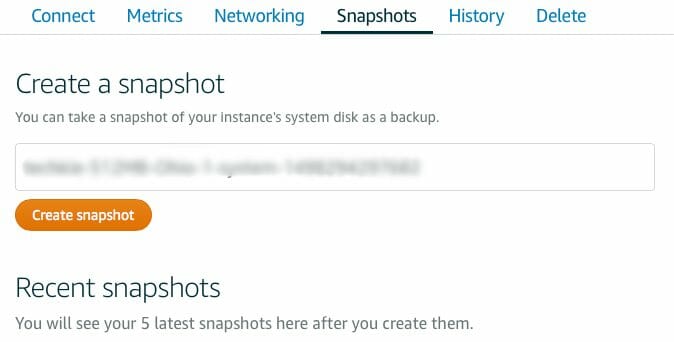
Once you are on the instance management panel, you can see a snapshot tab, which is for backup and restore.
You can click on the snapshot, select the instance and create a snapshot. This will create the backup of your complete disk.
If there is something wrong with your site and you want to restore, you can delete the instance and create a new instance with the snapshot backup. You can update the static IP to point to the new instance.
That’s how easy it is to take a backup and restore the WordPress site on LightSail.
Setup WordPress Emails
The one drawback with the Lightsail account is that it doesn’t come ready with an email server. So your current WordPress installation cannot send an email out.
If you need to have email services you need to set it up. Lightsail WordPress installation comes with pre-installed plugins, one of them is WP Mail SMTP.
WP Mail SMTP allows you to work with any SMTP service provider including Gmail accounts.
If you are planning to use Gmail account then you can also use the Gmail SMTP plugin. Just install the plugin and follow the setup instruction to add a Gmail account.
There are some other methods like installing the mail server on the instance but it will need some understanding of OS and package installation on Ubuntu.
Conclusion
You can use Lightsail Metrics tab to monitor the CPU, data bandwidth, and memory usage. You can check and optimise your installation accordingly.
Lightsail also provides constant monitoring for your WordPress installation, you can check the status check messages on the metrics section also.
I hope with the help of this tutorial you should be able to install fully function WordPress on the AWS Lightsail.


Is there any way to enter in the script section, when starting the new instance, to have it disable the banner and restart, also set a WP user and the password for them?
Hi Chris,
You can add an optional script which will be run first time instance is launched. You can do that after selecting the OS and Apps for your instance. There is an optional launch script section on the screen. For the wordpress user, you can use the WP-CLI to get that work done.
Sanjeev