AWS CloudFront is a CDN service provided by Amazon, which I am using on this blog to deliver my content. If you are following this blog, you would have noticed by now that I am using more and more AWS services to get my work done.
When I started to look for WordPress shared hosting options, I finalise AWS LightSail Service to host this blog. Now I have integrated it with AWS CloudFront to enable the CDN support for it.
In this post I will discuss my thoughts of when to enable the CDN support and how to do it with CloudFront.
When You Should Enable CDN
One of the questions which I get very frequently is when you should enable CDN support for your blogs?
Many people want to know if they need to wait for the traffic before enabling CDN or should they need to go ahead and invest without any income?
This is a catch 22 situation, you won’t start generating enough income in a short time without CDN support and most of the CDN services usually start with a fixed basic cost.
I have started this blog keeping cost in mind and I am tracking each and every penny spend on this. So I myself have gone through this situation and looked at the costs very closely, this is what I suggests.
You should enable the CDN on your blog from Day 1
Yes, there is no excuse for not providing faster experience to your users and that is particularly true, if you are targeting multiple geo-locations. You should enable it on day 1 and make sure your blog load fast for your users.
How To Manage Cost
Now the next thing to talk about is cost, how should we manage it? So lets check what I have done with this blog to manage my cost effectively.
Usually when you start your blog, you would not want higher fixed costs as you would be looking to build your income. So at this time, I prefer solutions which is charged pay per use basis. Once you generate enough traffic that the pay per use cost starts increasing, you can look to move.
There are few CDN providers which runs with a free plan but most of them have some restrictions. I was looking for an option which can provide complete flexibility and faster turnaround. Amazon Web Services is one such provider.
I have talked about how I have finalised and install this blog on Amazon LightSail. So it make sense to integrate another service of AWS with this blog.
Now even if you are running on any other WordPress Shared Hosting, you should still be able to use AWS CDN without any issue.
Why AWS CloudFront CDN For WordPress
There are many reasons why I have chosen AWS CloudFront as my CDN provider. If you are new to AWS you get limited usage free for first full year. In the free tier, you will get 50GB free data out and up to 2,000,000 http/https request. This should be good enough for most of the starter blogs.
Once you cross the limit, you will be charged for what you use. So there is no fixed monthly cost and you can still provide a better experience to your users.
What does it give you?
AWS currently has 16 region and 42 availability zones for its users. What is region and zones?
Region – It is like a geo-location with a collection of multiple zones mapped with a physical data center. Every Region is physically isolated from and independent of every other Region in terms of location, power, water supply, etc.
Zones – It’s a logical data center in a Region available for use by any AWS customer. They have all the contingency build so two zones will not fail together.
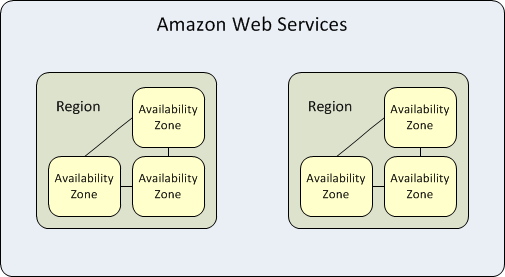
Rackspace blog has a good article to describe region and zones of AWS. For the people from technical background – each region is completely independent. Each Availability Zone is isolated, but the Availability Zones in a region are connected through low-latency links.
These 16 Regions cover almost all over the world geo-locations and 2 more are planned by end of this year. So your content will always have a closer location to your users and will be served fast.
I also like StackPath (Formally MaxCDN) plans as they provide a good balance between cost and usage. The only issue is their basic plan starts with $20 per month. You can use the promo code ‘TECHKLE25’ to get 25% off on your pricing but still it will cost $15.
StackPath gives 200 GB global bandwidth in its starter plan, if you compare it with AWS CloudFront, they will charge you around $18 – $22 for that kind of bandwidth. So price wise its not much different but on AWS, you will only pay for what you have used. This is very good for the starter blogs as they always have constrained budget.
Do I need S3 Bucket?
If you start looking for information about AWS CloudFront, you would see many pages talking about including including AWS S3 Bucket and CloudFront to WordPress. So many people gets confused that they need to create a S3 bucket and than use it as a origin for CloudFront.
No, You don’t need S3 Bucket for using AWS CloudFront with WordPress
Also remember that S3 bucket gets charged separately, so until you have a business need to use it, I would not recommend it.
How to Enable AWS CloudFront CDN Service
There are two steps which you need to complete to enable AWS CloudFront for WordPress.
- Enable a pull service in AWS CloudFront to fetch your files. AWS doesn’t charge for incoming data, so this data transfer will be free of cost.
- Point your files to AWS CloudFront in your WordPress install, so it can be picked up from there.
Don’t worry both the steps are very easy to accomplish.
Enable a Pull Service
You can go to your AWS Console and look for CloudFront service. Now you need to create a new distribution, which will be used to supply your files.
Once you click on create distribution, it will ask what kind of delivery method you want – Web or RTMP.
Web – To distribute static files from your blog
RTMP – To distribute media files like audio and video
For our usage we can select Web as we will be serving files from our WordPress installation. You need to enter origin details in the next screen, here you will update the detail of your blog.
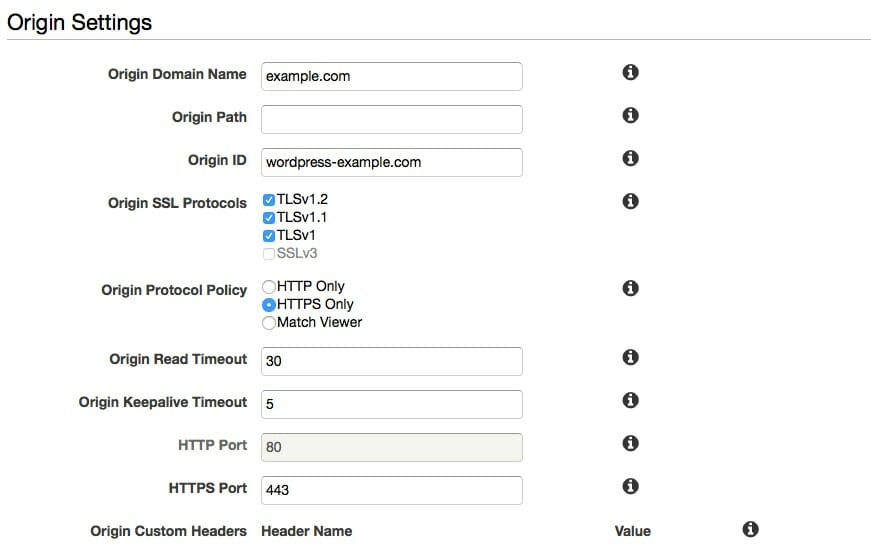
Specify the origin domain name, protocol policy and other general settings. There are few important settings which are mentioned below:
Origin Domain Name – Domain name for your blog which needs to be integrated with AWS CloudFront
Price Class – AWS is charged differently based on the region, so if you want to avoid pricier location and want to serve content from certain regions, you can select here.
Alternate Domain Names – If you want to use your own CNAME rather than the AWS provided name, you can set it here. Alternatively it will create a domain name for you, which might not be easily readable. So if you want to change it, you can do it here.
Geo Restrictions – If you want to restrict your content at some geo location, you can do it here.
You can also set your http vs https settings also here, decide how you want to serve your content. If you have enabled https and want all http request to redirect to https, you can set it up here.
Don’t Miss: How To Setup Emails on AWS LightSail WordPress Install
Enable AWS CloudFront In WordPress
Once you have create a distribution, it will pull all the files from your sites and will cache it in AWS. Now you need to point your WordPress to AWS distribution for your static files.
You can do that with W3 Total Cache plugin, it provides support for AWS CloudFront. Before you make that connection, you need to create a access id and security key for your AWS account.
You can just enable it and set it as a mirror also but that doesn’t give fine grain controls. So I prefer the access id and security key method.
Create a access ID and security Key
You can go to AWS Console and look for IAM. Create a new user and give it any name you like. Select the Programmatic access method under access type, we do not want that user id to login to AWS console.
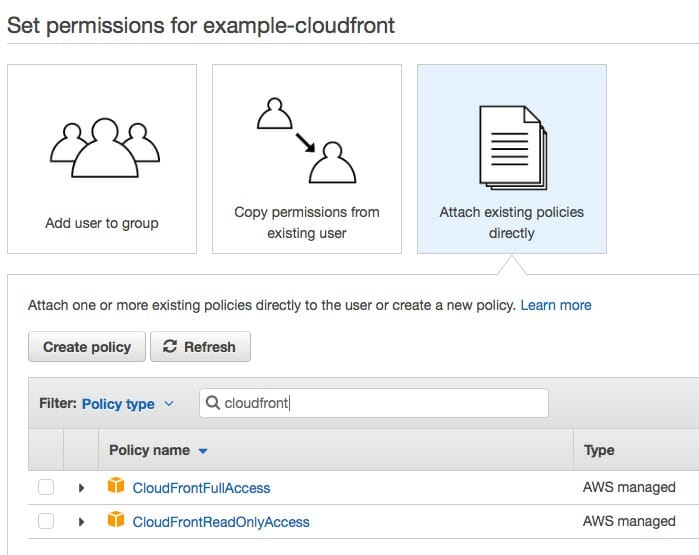
Now you need to provide authority for CloudFront to this user. Attach pre-made policy CloudFrontFullAccess and CloudFrontReadOnlyAccess to the user. Once you are done, it will generate a access id and secret key, make a note of it.
Update W3 Total Cache
Now go to General Setting in W3 Total Cache and enable CDN with Amazon CloudFront. After enabling it, you need to create a connection to AWS.
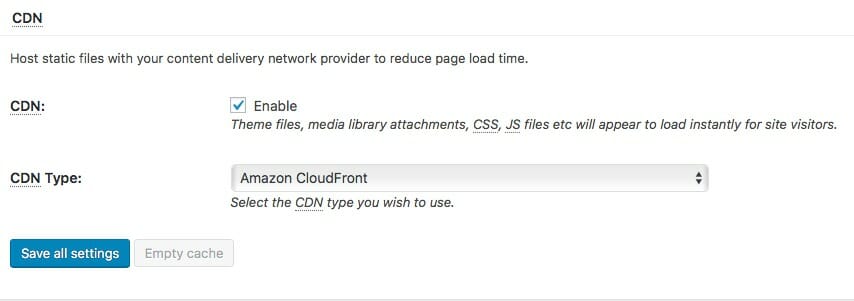
Go to CDN page and it will ask for access id, secret key and domain name. You can enter the details and it will create a connection to AWS.
Domain name will be what you have given in CNAME section of CloudFront or will be assigned for you. You can get it from AWS CloudFront dashboard.
You can update what kind of files you want to serve from your CDN and W3 Total Cache will update the links to point to CDN. Now if you open your blog, your static files will be served from AWS CloudFront.
You can also skip using CDN for logged in users or administers, if you want to save some cost. But I would recommend to periodically check your blog as a normal user. You may want to keep it as close as other user of your blog so all gets a single consistent view.
You can also set it up with WP Super Cache with ease, just provide the alternate URL and enable the CDN support, it will start serving the file from AWS CloudFront.
That’s how you can enable the CDN service for your WordPress blog with AWS CloudFront. Which CDN service are you using for your blog and when did you enable it? Did you wait for some before using the CDN service with your blog?


This is a must have Sanjeev. I speed up my blog considerably by adding a CDN about 1 year ago to the day. My developer begged me. Finally I agreed. Thank goodness I did, because even back then I noticed slow load times whenever I published a few post. I’d hate to think how slowly my blog would load these days sans CDN,
I agree Ryan. Also sometimes if the web server is located in same region as we are, we do not notice that it will be slow in other regions. CDN takes away server location from the equation and provide similar experience in all the regions. Must have now a days.
Thanks,
Sanjeev
Hello Sanjeev,
Wonderful post. Adding a CDN to your blog can definitely increase the performance of a blog. I am using cloudflare for my blog from the day 1 and it helps me to optimize my blog and increase its performance, I also recommend to using CDN services to my clients and blog readers. Thanks for sharing this great piece of content. Very Informative.
With Regards,
Vishwajeet
Hi Vishwajeet,
Cloudflare is a good alternative with a free plan to start, which will be good for starter blogs. I do prefer bit more freedom in terms of flexibility with no restriction. That’s why opt for AWS Cloudfront.
There is no good reason to not opt for CDN these days with so many options around.
Thanks,
Sanjeev
Hi Sanjeev,
Right now, I am using the free Cloudflare on SiteGround. I’ve often considered signing up with a CDN service. Can you use both Cloudflare and a CDN?
Right now my blog is still fairly new, but it is starting to grow. I don’t want to wait too long before I set it up with a CDN because I know how important site speed is.
If I visit a blog and it takes forever to load, I don’t wait around. I’m off to the next blog.
I’ll have to take a closer look at setting up a CDN this weekend.
Thanks for sharing this tutorial with us, it will help us get our CDN set up without any flaws.
Have a great day 🙂
Susan
Hi Susan,
Cloudflare free plan is a good alternative to other paid options.
Though theoretically it is possible to use two different CDN providers and serve different type of files from them, but it needs a bit of customisation. The benefit of CDN is having the files closer to the user, once you are serving the file from close proximity, you might not gain much by dividing that workload.
If you are planning to look for a professional CDN service, I would suggest to take a look at AWS Cloudfront. Its easy to setup with W3 Total Cache and provides distribution server all over the world. A good amount of bandwidth is free for first year.
Thanks,
Sanjeev